How to Put Your WordPress Site into Maintenance Mode 2019:
How to Put Your WordPress Site into Maintenance Mode 2019:
Adding a maintenance to your wordpress website that the user
can understand about your site, and you can avoid endangers customer that not
feeling bad about your web service.
Generally, maintenance mode is required to redesign your
site such as manually setting up a new theme or configuring a new plugin that
changes the behavior of your website, updating the site content, fixing bugs on
your site and protecting user data’s from security bugs etc. even though
sometimes we require maintenance mode may need to work on your website for a
longer period.
Let see in this article, we are going to see top 4 ways to
activate maintenance mode of your wordpress website.
Method:1 Add a piece of code on your Site:
For that you can add below mentioned php code for your
website’s function.php. for that login to your wordpress admin panel => go
to appearance => theme editor => when your login in to first time you get
an alert mail of that “editing theme source code is not advisable” then click
on I understand => find theme’s function.php file in the right corner.
Just copy the code below mentioned and paste it on your
function.php file and save it.
- // Activate WordPress Maintenance Mode
- function wp_maintenance_mode() {
- if (!current_user_can('edit_themes') || !is_user_logged_in()) {
- wp_die('<h1>Under Maintenance</h1><br />Website under planned maintenance. Please check back later.');
- }
- }
- add_action('get_header', 'wp_maintenance_mode');
Note: Before doing the same please backup your wordpress
file.
This file announces that “the site is under construction”
when the user visits your site.
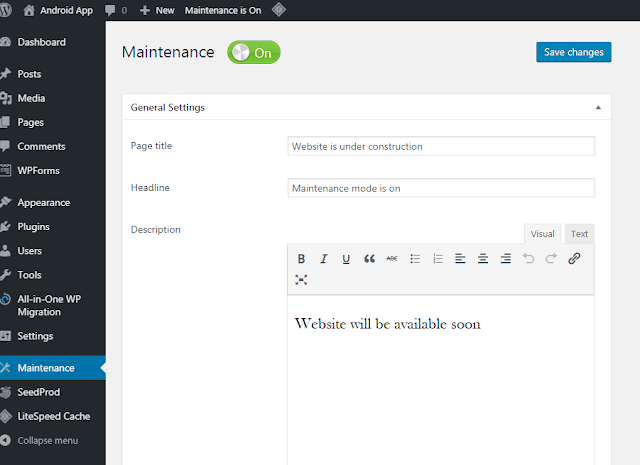
Method2: Add maintenance plugin to your wordpress site.
There are lot of plugins are available in your plugin store,
but we recommend you to install Maintenance
plugin. It is easy and free plugin and you can activate from plugin store.
Also you can add custom image in your home page using this wordpress
maintenance plugin.
To install this plugin, login to your wordpress admin panel
=> go to plugin => add new plugin => search in the name of “maintenance”
=> install the maintenance plugin
Note: maintenance mode will be activated when the user and visitor
are entering into your site. It shows normal website for the admin login.
Method3: using .httacess method:
This method will be quite simple and wordpress admin cannot
access admin panel as well as the page indicates the users that your site is
under maintenance. To create maintenance page just copy and paste the below
mentioned html code on your site and follow the steps.
Login to your cpanel => go to file manager => in that
go to public_html folder and create new file name as maintenance.html.
- RewriteEngine On
- RewriteBase /
- RewriteCond %{REQUEST_URI} !^/maintenance\.html$
- RewriteRule ^(.*)$ https://example.com/maintenance.html [R=307,L]
Go to .htaccess file on public_html => paste the below mentioned code => Save it.
Never forget to change example.com to your site
Never forget to change example.com to your site
Thats all, your wordpress will redirect all of your pages to maintanence.html.


Comments
Post a Comment